Evening all..
Having seen a couple of threads detailing covering the rear C pillars (vs replacing..) I've decided to follow suit...
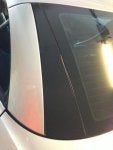
My pillar covers had one or two small scratches, nothing major, but I know they're there....
So, one roll of fairly high quality CF film later..
Before & after pics now attached
![Image]()
![Image]()
Subtle, but far tidier..
As per other posts, all I did was cut out a larger piece thanthe cover, stick on (working from the centre outwards to remove bubbles) and then trim in situ with a new scapel blade (X Acto for those over t'pond) - simples...
I'll take a look at the front bumper vents (as per the Black Series bumper) too, but not much more... don't want to over do it...
Cheers
Sean

PS – check out http://www.slkworld.com/united-kingdom-region/31725-east-midlands-rabbit-chase.html for info on the possible East Midlands ‘Rabbit Chase”
Mods so far...
Airscarf Retro-fit http://www.slkworld.com/general-modifications-r171/27470-project-airscarf-starts-here.html
Alpine double-din touchscreen head unit with Bluetooth, Nav, DVD, reverse camera and iPod with a ‘Small’ sub in the boot http://www.slkworld.com/slk-r171-general-discussion/26915-amplifier-location.html
Mercedes Genuine rear Windscreen http://www.slkworld.com/general-modifications-r171/32951-new-windscreen-one-back.html
Display& steering wheel integration for the head unit.
Digital Climate control panel, Sun sensor and Pollution sensor fully working http://www.slkworld.com/general-modifications-r171/30240-climatronic-retrofit-digital-climate-control.html
Hat-shelf mounted solar charging panel
Rain Sensor for Auto-wipe retrofit
Various coding changes to the Instrument cluster – see below
AMG Aluminium gear change paddles instead of the buttons http://www.slkworld.com/general-modifications-r171/31587-amg-aluminuum-gear-change-paddle-retrofit.html
Facelift SLK Antenna http://www.slkworld.com/general-modifications-r171/32272-facelift-antenna-tick-otherwise-known-two-minute-mod.html
Harman Kardon speaker upgrade – All 11 !! http://www.slkworld.com/general-modifications-r171/31530-hk-speaker-upgrade.htmlCustom dimming LED DRL’s http://www.slkworld.com/general-modifications-r171/32992-looking-drls.htmlLED’s… in various places…[x] - Map…[x] – Dome…l [x] – Number plate…[x] –Side…[x] – Puddle http://www.slkworld.com/general-modifications-r171/33120-leds-were-all.html
Full blown TPMS… http://www.slkworld.com/general-modifications-r171/33263-tpms-retrofit-its-started.html
Auto Dimming rearview mirror with integrated GPS Speed Camera detector BEHIND the glass…. http://www.slkworld.com/general-modifications-r171/35096-my-solution-dimming-interior-mirror-look-away-if-you-dont-want-see-things-getting-cut-up.htmlPower Folding mirrors… http://www.slkworld.com/general-modifications-r171/33942-folding-mirrors-making-start.html
Designo style Alcantara head lining / A Pillars and various other bits….
Johns 3rd brake light gizmo http://www.slkworld.com/general-modifications-r171/15456-johns-3rd-brake-light-adapter.html
Mods in progress
Parktronic retrofit – nearly all the bits are here….. Just need the main loom now….
…soon this section will be empty …!
Mods on the wish list
Maybe a Smarttop....
Illuminated Sills – I have a cunning plan…
Coding Mods… http://www.slkworld.com/slk-r171-general-discussion/31073-my-adventrures-star-diag.html
[x] - Enable those pesky phone buttons on the steering wheel - FINALLY DONE - WOOHOO
[x] - Enable Auto-wipe – done
[x] - Add temperature display to the lower MFD - done
[x] - Enable tyre pressure Loss Warning - done
[x] - Enabled Folding mirrors – done
[x] - Enable Gallons Remaining in the MFD – done
[x] - Enable Cornering Fogs - done
[x] - Enable both rear fogs - done
[x] - Enable Alarm 'chirping' – done
[x] - Enable TPMS display in the upper MFD – done
[ ] - Enable Highline TPMS – proving tricky!!, but we have some great brains on the case….
Having seen a couple of threads detailing covering the rear C pillars (vs replacing..) I've decided to follow suit...
My pillar covers had one or two small scratches, nothing major, but I know they're there....
So, one roll of fairly high quality CF film later..
Before & after pics now attached


Subtle, but far tidier..
As per other posts, all I did was cut out a larger piece thanthe cover, stick on (working from the centre outwards to remove bubbles) and then trim in situ with a new scapel blade (X Acto for those over t'pond) - simples...
I'll take a look at the front bumper vents (as per the Black Series bumper) too, but not much more... don't want to over do it...
Cheers
Sean

PS – check out http://www.slkworld.com/united-kingdom-region/31725-east-midlands-rabbit-chase.html for info on the possible East Midlands ‘Rabbit Chase”
Mods so far...
Airscarf Retro-fit http://www.slkworld.com/general-modifications-r171/27470-project-airscarf-starts-here.html
Alpine double-din touchscreen head unit with Bluetooth, Nav, DVD, reverse camera and iPod with a ‘Small’ sub in the boot http://www.slkworld.com/slk-r171-general-discussion/26915-amplifier-location.html
Mercedes Genuine rear Windscreen http://www.slkworld.com/general-modifications-r171/32951-new-windscreen-one-back.html
Display& steering wheel integration for the head unit.
Digital Climate control panel, Sun sensor and Pollution sensor fully working http://www.slkworld.com/general-modifications-r171/30240-climatronic-retrofit-digital-climate-control.html
Hat-shelf mounted solar charging panel
Rain Sensor for Auto-wipe retrofit
Various coding changes to the Instrument cluster – see below
AMG Aluminium gear change paddles instead of the buttons http://www.slkworld.com/general-modifications-r171/31587-amg-aluminuum-gear-change-paddle-retrofit.html
Facelift SLK Antenna http://www.slkworld.com/general-modifications-r171/32272-facelift-antenna-tick-otherwise-known-two-minute-mod.html
Harman Kardon speaker upgrade – All 11 !! http://www.slkworld.com/general-modifications-r171/31530-hk-speaker-upgrade.htmlCustom dimming LED DRL’s http://www.slkworld.com/general-modifications-r171/32992-looking-drls.htmlLED’s… in various places…[x] - Map…[x] – Dome…l [x] – Number plate…[x] –Side…[x] – Puddle http://www.slkworld.com/general-modifications-r171/33120-leds-were-all.html
Full blown TPMS… http://www.slkworld.com/general-modifications-r171/33263-tpms-retrofit-its-started.html
Auto Dimming rearview mirror with integrated GPS Speed Camera detector BEHIND the glass…. http://www.slkworld.com/general-modifications-r171/35096-my-solution-dimming-interior-mirror-look-away-if-you-dont-want-see-things-getting-cut-up.htmlPower Folding mirrors… http://www.slkworld.com/general-modifications-r171/33942-folding-mirrors-making-start.html
Designo style Alcantara head lining / A Pillars and various other bits….
Johns 3rd brake light gizmo http://www.slkworld.com/general-modifications-r171/15456-johns-3rd-brake-light-adapter.html
Mods in progress
Parktronic retrofit – nearly all the bits are here….. Just need the main loom now….
…soon this section will be empty …!
Mods on the wish list
Maybe a Smarttop....
Illuminated Sills – I have a cunning plan…
Coding Mods… http://www.slkworld.com/slk-r171-general-discussion/31073-my-adventrures-star-diag.html
[x] - Enable those pesky phone buttons on the steering wheel - FINALLY DONE - WOOHOO
[x] - Enable Auto-wipe – done
[x] - Add temperature display to the lower MFD - done
[x] - Enable tyre pressure Loss Warning - done
[x] - Enabled Folding mirrors – done
[x] - Enable Gallons Remaining in the MFD – done
[x] - Enable Cornering Fogs - done
[x] - Enable both rear fogs - done
[x] - Enable Alarm 'chirping' – done
[x] - Enable TPMS display in the upper MFD – done
[ ] - Enable Highline TPMS – proving tricky!!, but we have some great brains on the case….