Hello guys,
I am quite new here since I have only had my 230komp for about 3 weeks, but I have already benefitted a lot from all the great posts and advice here (both prior to and after the purchase of my car). Thanks a bunch fella's!!
While washing the marvel the other day I noticed that the drain plugs were clogged. I logged on here and sure enough, it seems to be a rather common issue. However, during my search for solutions I did not come across a post that summed up the drain locations and tips on cleaning each of them. I should mention though that I had great use of the post on how to clean the "rear window drain" with compressed air and a tube - that was the worst of them all.
Anyway, this post is an attempt to summarize the drain points on the 170 and share my experiences on cleaning them. I will focus only on the tubed drains which are designed to drain water to the ground (as opposed to alle the hollow rubber seals on these cars. I am hoping that others will chime in with additional info/tips/experiences to the benefit of all.
I found 8 drains on my car:
 ) and a piece of 5mm rubber tube for cleaning of drains nos. 1-7. Could not make this work for drain no 8 but was finally successful cleaning this drain with pressurized air.
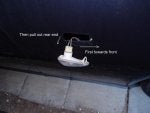
Ad 1: The position of drain 1 is below the plastic cover for the wiper arrangement which is attached to the bottow part of the windscreen all the way to the drivers side. It is not necessary to remove the cover to clean the drain which can be accessed at the end of the cover at the driver side (where all the leaves and other crud is washed over the edge of the cover and into the drain 🇹🇩) but it will help to undo a couple of the screws that fixes the cover to the firewall to remove whatever is caught at the top of this drain. This drain is routed in a very windy way around the fuse box and through the inside liner of the engine compartment towards the front fender. The lower part of this drain (which is where the real blockage is probably located) can be accessed through the hole for the side indicator light. The indicator assembly is easily removed by sliding it towards the front of the car and then pulling out the rear end of the assembly. The rubber hose of the drain is now visible through the hole. If you have anything larger than slim fingers, you'll need a pair of small pliers or similar to grab the hose and extend the lower end of it out through the hole. The hose is only long enough to just reach out through the hole and you can easily clean the crud out.
Ad 2: If you found drain no 1 - you'll have no trouble finding no 2. It is all the way to the passenger side and easier to clean as it is more straightly routed. Same procedure as for no 1 getting access through the indicator light hole.
Ad 3: Drain no 3 on my car has no tube connected and drains directly onto the gearbox. This was not clogged on my car but would supposedly be the easiest to access and clean simply by working with your fingers through the drain hole from below.
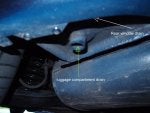
Ad 4: This drain is located just between the rear window and the trunk lid and has a grille cover mounted over the opening. This drain hose is routed towards the rear of the car between the black plastic liner of the luggage compartment and the rear fender and ends at the lower rear inside of the bumper on the driver side. Yeah, I know it is a lousy explanation and I did not have my camera handy when I did this job (and even if I did I would not have wanted to put my hands on it). You can locate and follow the drain hose through the hole behind the first aid kit and see where it exits into the bumper - with this in mind you should be able to locate the end opening of the drain hose by getting under the car with a flash light. This is the most difficult of all the drains to clean - but also the most important (along with no 5). I made good use of the flex plastic wire and blowing through the rubber hose intermittently. In retrospect I think I would fill up the drain hose by pouring water into it and then get under the car and massage the end of the drain hose with a screwdriver or similar to get the crud out that way. Either way I believe that it will take a good amount of time and dizzyness (if you like me do not have a compressor - hmmm isn't there one in the trunk for the tyre repair kit...? Doh!). Just hang in there, it is such a relief when the big splash of muddy water is all over the floor.
Ad 5: Pretty much like no 4 just on opposite side of course. This hose can be tracked through the hole where the hydraulic pump is located (remove the lid which is located just opposite the first aid kit in the passenger side of the trunk).
Ad 6: This drain point is easily noticeable from under the car with its cylindrical outlet with a rubber seal in it. It can be seen from the top side through the "broom" seals along the trunk lid arm arrangement. This drain is intended for draining the inside of the trunk and you will hopefully thus hopefully never need it but it should d... well not be clogged in case you do!
Ad 7: Same as 6 - just opposite side.
Ad 8: Located below the fuel cap and is routed alongside drain tubn no. 5 described above, which means that it is very difficult to get to. I could not clean this with the fishing tape. I eventually blew the crud out (carefully) with pressurized air from a "gun". I wrapped some paper tissue around the air tube to make a seal between the air tube and the drain pipe - worked like a charm. I guess this method would be effective for all the other drains too...
I hope that the above can be of some help to someone. It is a very easy claning job to do and it will do your car a lot of good to be able to get rid of the rain or washing water in stead of accumulating pools at the front and getting into the trunk and its electric modules at the back.
Have fun!
Raindog
[EDIT - Myk}
For underneath windscreen cowl see >>LINK<< thanks @Rïn
I am quite new here since I have only had my 230komp for about 3 weeks, but I have already benefitted a lot from all the great posts and advice here (both prior to and after the purchase of my car). Thanks a bunch fella's!!
While washing the marvel the other day I noticed that the drain plugs were clogged. I logged on here and sure enough, it seems to be a rather common issue. However, during my search for solutions I did not come across a post that summed up the drain locations and tips on cleaning each of them. I should mention though that I had great use of the post on how to clean the "rear window drain" with compressed air and a tube - that was the worst of them all.
Anyway, this post is an attempt to summarize the drain points on the 170 and share my experiences on cleaning them. I will focus only on the tubed drains which are designed to drain water to the ground (as opposed to alle the hollow rubber seals on these cars. I am hoping that others will chime in with additional info/tips/experiences to the benefit of all.
I found 8 drains on my car:
- Driver side front windscreen
- Passenger side front windscreen
- Center front windscreen
- Driver side rear window
- Passenger side rear window
- Driver side luggage compartment
- Passenger side luggage compartment
- Fuel cap drain
) and a piece of 5mm rubber tube for cleaning of drains nos. 1-7. Could not make this work for drain no 8 but was finally successful cleaning this drain with pressurized air.Ad 1: The position of drain 1 is below the plastic cover for the wiper arrangement which is attached to the bottow part of the windscreen all the way to the drivers side. It is not necessary to remove the cover to clean the drain which can be accessed at the end of the cover at the driver side (where all the leaves and other crud is washed over the edge of the cover and into the drain 🇹🇩) but it will help to undo a couple of the screws that fixes the cover to the firewall to remove whatever is caught at the top of this drain. This drain is routed in a very windy way around the fuse box and through the inside liner of the engine compartment towards the front fender. The lower part of this drain (which is where the real blockage is probably located) can be accessed through the hole for the side indicator light. The indicator assembly is easily removed by sliding it towards the front of the car and then pulling out the rear end of the assembly. The rubber hose of the drain is now visible through the hole. If you have anything larger than slim fingers, you'll need a pair of small pliers or similar to grab the hose and extend the lower end of it out through the hole. The hose is only long enough to just reach out through the hole and you can easily clean the crud out.
Ad 2: If you found drain no 1 - you'll have no trouble finding no 2. It is all the way to the passenger side and easier to clean as it is more straightly routed. Same procedure as for no 1 getting access through the indicator light hole.
Ad 3: Drain no 3 on my car has no tube connected and drains directly onto the gearbox. This was not clogged on my car but would supposedly be the easiest to access and clean simply by working with your fingers through the drain hole from below.
Ad 4: This drain is located just between the rear window and the trunk lid and has a grille cover mounted over the opening. This drain hose is routed towards the rear of the car between the black plastic liner of the luggage compartment and the rear fender and ends at the lower rear inside of the bumper on the driver side. Yeah, I know it is a lousy explanation and I did not have my camera handy when I did this job (and even if I did I would not have wanted to put my hands on it
). You can locate and follow the drain hose through the hole behind the first aid kit and see where it exits into the bumper - with this in mind you should be able to locate the end opening of the drain hose by getting under the car with a flash light. This is the most difficult of all the drains to clean - but also the most important (along with no 5). I made good use of the flex plastic wire and blowing through the rubber hose intermittently. In retrospect I think I would fill up the drain hose by pouring water into it and then get under the car and massage the end of the drain hose with a screwdriver or similar to get the crud out that way. Either way I believe that it will take a good amount of time and dizzyness (if you like me do not have a compressor - hmmm isn't there one in the trunk for the tyre repair kit...? Doh!). Just hang in there, it is such a relief when the big splash of muddy water is all over the floor.Ad 5: Pretty much like no 4 just on opposite side of course. This hose can be tracked through the hole where the hydraulic pump is located (remove the lid which is located just opposite the first aid kit in the passenger side of the trunk).
Ad 6: This drain point is easily noticeable from under the car with its cylindrical outlet with a rubber seal in it. It can be seen from the top side through the "broom" seals along the trunk lid arm arrangement. This drain is intended for draining the inside of the trunk and you will hopefully thus hopefully never need it but it should d... well not be clogged in case you do!
Ad 7: Same as 6 - just opposite side.
Ad 8: Located below the fuel cap and is routed alongside drain tubn no. 5 described above, which means that it is very difficult to get to. I could not clean this with the fishing tape. I eventually blew the crud out (carefully) with pressurized air from a "gun". I wrapped some paper tissue around the air tube to make a seal between the air tube and the drain pipe - worked like a charm. I guess this method would be effective for all the other drains too...
I hope that the above can be of some help to someone. It is a very easy claning job to do and it will do your car a lot of good to be able to get rid of the rain or washing water in stead of accumulating pools at the front and getting into the trunk and its electric modules at the back.
Have fun!
Raindog
[EDIT - Myk}
For underneath windscreen cowl see >>LINK<< thanks @Rïn