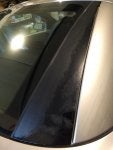
I read a few threads here about how to refinish rear pillars where the clearcoat was fading and peeling. On my recently purchased 2008, both rear pillars had faded with about half of the pillar (near the window) having the clearcoat peeled away, so I wanted to resolve that problem.
The options I evaluated:
1. Buy new covers and have a dealer or shop install them. Rejected: too expensive (seemed to be $500 or more for the parts and labor)
2. Buy new covers and install them myself. Rejected - seemed to be a hassle to get the top in the right position, remove the old ones, and install the new ones without scratching something. Also, the parts were not cheap.
3. Refinish them myself by sanding and painting. Rejected - due to time involved (have to wait for each coat to dry, re-sand, etc. then add a clearcoat). Also, I wasn't too confident in my ability to do a good job on this, and didn't want to spend a lot of time and then have to resort to items 1 or 2 above.
4 The winner: Re-cover them in vinyl. I'd read mention of this, and thought, "How hard could it be?". Very little risk: if I messed it up, I could just peel it off.
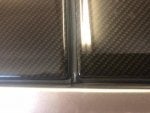
Turns out it's pretty easy, low risk, inexpensive, doesn't take long, and I think it looks good. You can judge for yourself. I've posted some pics.
Total cost: $17
Total time: 2 hours
Tools/items needed:
1. Roll (I got a 12" x 5 foot roll) of 3M vinyl in whatever pattern you want. I chose 3M vinyl wrap 1080 matte carbon fiber because I thought it would look good on my silver SLK. There are many varieties, including ones with super tiny holes that help minimize air bubble issues. That's what I got, on eBay, for around $17.
2. Scissors for cutting the rough shape of the vinyl
3. Exacto knife or razor blade for doing the final trimming of the vinyl
4. Hair dryer or heat gun for warming the vinyl to make it easier to stretch and get out bubbles
5. Teflon tools for working on car interiors. I already had some but you can get a full set on Amazon for around $10. You could substitute large flathead screwdrivers and cover it in masking tape or duct tape to soften the hard metal edge of the blade.
6. Blue painter's tape or masking tape for edging around the pillar so you don't scratch up the car
7. Sandpaper (a selection of 360/600/1000 grit would work) for smoothing out the rough spots on the pillar so that the vinyl lays flat
8. rags, paper towels or other clean absorbent cloth
9. Kitchen cleaner (NOT OVEN CLEANER. Shouldn't have to say that, but...). This is for de-greasing the pillars prior to final vinyl install.
10. Another person so you have an extra set of hands. Not absolutely necessary, but it makes the job easier.
Process:
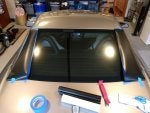
1. Put tape around the edges of both pillars so you don't scratch up your paint or window.
2. Use a wet-sanding technique to smooth out the pillars. Start with 360 grit. Dip the sandpaper into some clean water and start sanding the pillars. You'll start getting a grey slurry/film on the pillar and sandpaper. Wipe it off with a damp paper towel and keep going. You'll have fine scratches on the pillars, but you'll be able to feel the overall surface start to get smoother. Move on to the 600 grit, same technique. Then finish off with the super-fine 1000 grit. When wet, they'll look great, but when dry the pillars will be a dull black and you may still see some fine scratches. The surface of the entire pillar should feel very smooth.
3. Cut the vinyl to shape. Leave yourself at least 1" overlap all the way around. You might want to make a template out of some cardstock or other material if you don't trust yourself. This is not the final sizing/cutting step. Just get it close in size with enough wiggle room. I was able to cut out both pieces from a 12"x24" piece with material left over. I still have 3' left on the roll.
4. Do not remove the backing yet! Lay the pieces out over the pillars to make sure they're the right size. I taped mine at the top near the roof with a small piece of blue tape just to hold them in place.
5. Clean the pillars. I lifted mine up, sprayed the kitchen cleaner and wiped it clean with a paper towel. This gets rid of any fingerprits, oils, etc. and gives the vinyl a nice clean surface to adhere to.
6. Warm up one of the vinyl pieces with the hairdryer. You don't need a ton of heat, but do make sure it's warm. You should feel the vinyl become more pliable. Don't worry if it starts to cool down during the next steps - you can always apply more heat.
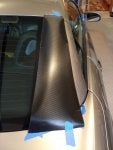
6. Game Time! Peel off the backing of one of the pieces, line the piece up over the pillar, and start pressing it down near the middle of the pillar. Start in the middle and work to the edges. Warm it up with the hairdryer and stretch it. If you have air bubbles, you can pull back the vinyl to the bubble and then lay it down again. I just used my fingers to smooth out the bubbles and stretch the vinyl, but some people like to use a plastic tool to smooth it out. A credit card would probably work. Smooth out any air bubbles.
7. Now you have a piece of vinyl laying flat on the pillar. Nice job! You're not done yet. Because you left some overlap all around, you now need to do a fine trimming of the vinyl. Use the razor blade or Exacto knife for this. Trim so that your overlap is enough to tuck around the sides and underneath the pillar. This is about 2-3 millimeters. A guide I used is trimming it close to the edge of the rubber seal around the pillar. There's about a 1-2mm gap, and if you cut it a little further away from the pillar you should be fine.
8. Time to tuck it in. This takes patiences. Heat the vinyl so it's pliable because cool vinyl won't tuck nicely. Pick an edge of the pillar, lift the pillar using a prying tool (just enough to do the tuck). Tuck the vinyl under the pillar an inch or so at a time, working your way down (or up) the edge. I used one of the teflon tools to do this. Periodically warm the vinyl to make things go smoother. Patience! Don't force the speed of tucking, just do it a little at a time. Trust me, taking your time here really doesn't take too much time (30min total for both pillars) and you'll save yourself aggravation.
9. Now that you're all tucked in, make sure there are no air bubble that got generated during the tucking process. Unless you had to peel the piece up, you shouldn't have any more bubbles.
10. Crack open a beer. You're done. Post a picture and let us enjoy your work. I've heard this vinyl will last 5 years out in the elements. Mine has been on a few months and still looks great.
The options I evaluated:
1. Buy new covers and have a dealer or shop install them. Rejected: too expensive (seemed to be $500 or more for the parts and labor)
2. Buy new covers and install them myself. Rejected - seemed to be a hassle to get the top in the right position, remove the old ones, and install the new ones without scratching something. Also, the parts were not cheap.
3. Refinish them myself by sanding and painting. Rejected - due to time involved (have to wait for each coat to dry, re-sand, etc. then add a clearcoat). Also, I wasn't too confident in my ability to do a good job on this, and didn't want to spend a lot of time and then have to resort to items 1 or 2 above.
4 The winner: Re-cover them in vinyl. I'd read mention of this, and thought, "How hard could it be?". Very little risk: if I messed it up, I could just peel it off.
Turns out it's pretty easy, low risk, inexpensive, doesn't take long, and I think it looks good. You can judge for yourself. I've posted some pics.
Total cost: $17
Total time: 2 hours
Tools/items needed:
1. Roll (I got a 12" x 5 foot roll) of 3M vinyl in whatever pattern you want. I chose 3M vinyl wrap 1080 matte carbon fiber because I thought it would look good on my silver SLK. There are many varieties, including ones with super tiny holes that help minimize air bubble issues. That's what I got, on eBay, for around $17.
2. Scissors for cutting the rough shape of the vinyl
3. Exacto knife or razor blade for doing the final trimming of the vinyl
4. Hair dryer or heat gun for warming the vinyl to make it easier to stretch and get out bubbles
5. Teflon tools for working on car interiors. I already had some but you can get a full set on Amazon for around $10. You could substitute large flathead screwdrivers and cover it in masking tape or duct tape to soften the hard metal edge of the blade.
6. Blue painter's tape or masking tape for edging around the pillar so you don't scratch up the car
7. Sandpaper (a selection of 360/600/1000 grit would work) for smoothing out the rough spots on the pillar so that the vinyl lays flat
8. rags, paper towels or other clean absorbent cloth
9. Kitchen cleaner (NOT OVEN CLEANER. Shouldn't have to say that, but...). This is for de-greasing the pillars prior to final vinyl install.
10. Another person so you have an extra set of hands. Not absolutely necessary, but it makes the job easier.
Process:
1. Put tape around the edges of both pillars so you don't scratch up your paint or window.
2. Use a wet-sanding technique to smooth out the pillars. Start with 360 grit. Dip the sandpaper into some clean water and start sanding the pillars. You'll start getting a grey slurry/film on the pillar and sandpaper. Wipe it off with a damp paper towel and keep going. You'll have fine scratches on the pillars, but you'll be able to feel the overall surface start to get smoother. Move on to the 600 grit, same technique. Then finish off with the super-fine 1000 grit. When wet, they'll look great, but when dry the pillars will be a dull black and you may still see some fine scratches. The surface of the entire pillar should feel very smooth.
3. Cut the vinyl to shape. Leave yourself at least 1" overlap all the way around. You might want to make a template out of some cardstock or other material if you don't trust yourself. This is not the final sizing/cutting step. Just get it close in size with enough wiggle room. I was able to cut out both pieces from a 12"x24" piece with material left over. I still have 3' left on the roll.
4. Do not remove the backing yet! Lay the pieces out over the pillars to make sure they're the right size. I taped mine at the top near the roof with a small piece of blue tape just to hold them in place.
5. Clean the pillars. I lifted mine up, sprayed the kitchen cleaner and wiped it clean with a paper towel. This gets rid of any fingerprits, oils, etc. and gives the vinyl a nice clean surface to adhere to.
6. Warm up one of the vinyl pieces with the hairdryer. You don't need a ton of heat, but do make sure it's warm. You should feel the vinyl become more pliable. Don't worry if it starts to cool down during the next steps - you can always apply more heat.
6. Game Time! Peel off the backing of one of the pieces, line the piece up over the pillar, and start pressing it down near the middle of the pillar. Start in the middle and work to the edges. Warm it up with the hairdryer and stretch it. If you have air bubbles, you can pull back the vinyl to the bubble and then lay it down again. I just used my fingers to smooth out the bubbles and stretch the vinyl, but some people like to use a plastic tool to smooth it out. A credit card would probably work. Smooth out any air bubbles.
7. Now you have a piece of vinyl laying flat on the pillar. Nice job! You're not done yet. Because you left some overlap all around, you now need to do a fine trimming of the vinyl. Use the razor blade or Exacto knife for this. Trim so that your overlap is enough to tuck around the sides and underneath the pillar. This is about 2-3 millimeters. A guide I used is trimming it close to the edge of the rubber seal around the pillar. There's about a 1-2mm gap, and if you cut it a little further away from the pillar you should be fine.
8. Time to tuck it in. This takes patiences. Heat the vinyl so it's pliable because cool vinyl won't tuck nicely. Pick an edge of the pillar, lift the pillar using a prying tool (just enough to do the tuck). Tuck the vinyl under the pillar an inch or so at a time, working your way down (or up) the edge. I used one of the teflon tools to do this. Periodically warm the vinyl to make things go smoother. Patience! Don't force the speed of tucking, just do it a little at a time. Trust me, taking your time here really doesn't take too much time (30min total for both pillars) and you'll save yourself aggravation.
9. Now that you're all tucked in, make sure there are no air bubble that got generated during the tucking process. Unless you had to peel the piece up, you shouldn't have any more bubbles.
10. Crack open a beer. You're done. Post a picture and let us enjoy your work. I've heard this vinyl will last 5 years out in the elements. Mine has been on a few months and still looks great.


")