Mercedes SLK World banner
Status
Not open for further replies.

Drain Holes

64K views 48 replies 19 participants last post by  LeonardoDaBenz  
#1 ·
Have recently seen a couple of threads where blocked drain holes have caused a problem.

Could some one post up a hopefully pictorial list of the location of the drain holes on a 171 so I can go check mine. I presume a straightened wire coat hanger is good for the job?

Thanks.

Steve
 
#7 ·
AFAIK, there are 3 in the engine compartment: one in the area at each end/side of the front windscreen, at the lower black plastic moulding that covers the lower part of the front windscreen/windshield; one can see a moulded screen on one side, and on another side some vanes that direct water flow; the third one is found inside the battery compartment.

In the boot/trunk area, there are 2 that I know of and is visible because of the corrugated rubber tubing. I have to yet learn whether there is an opening somewhere near the bottom of the rear fenders (where the rainwater wound drain out).
 
  • Like
Reactions: MW2012
Save
#8 · (Edited)
Drain Holes plus Grilles

Eddy and all,

Started to check out my car for blocked drain holes (Mine an R171 Right hand drive so some things may be reversed in LHD).

From standing in front of the car there is a single drain hole on the right hand side (looks a bit like a plug hole with a rectangular grid on it). It is located in a moulded plastic gully just in front of the windscreen. Mine was completely blocked with rotted leaves and other crud and after manually cleaning it out with my fingers (not pleasant) it needed to be flushed through with some hot soapy water.

On my car it would appear that there is only one drain hole like this just in front of the window and I suspect that the plastic moulded piece is made with some 'run off'' so that water is meant to run off in only the one direction. There were still a lot of leaves and other muck in the rubber seal on the left side which needed to be cleared away to allow the water to flow away properly.

Whilst in this area I lifted off the battery cover which takes all of 10 seconds - in order to check the drain in the bottom of the battery compartment. Apart from the area probably not having been cleaned since new it looked pretty clear. I poked at it with a dowel rod and you can see there is a sort of rubber diaphragm set a few inches down inside. Mine was clear but I poured some hot soapy water down the hole just to make sure and you could hear it all running out under the car.

I have decided to fit 2 additional grilles whilst I have the battery cover out. The first sits in the battery cover itself to try to prevent leaves etc getting down into the battery compartment and'or possibly getting drawn into the cabin intake fan. The first grille maybe superfluous because the bonnet grille is meant to do the same job however it only took a couple hours to do.

I purchased some aluminium grille which can easily be cut with scissors and slowly shaped it to the opening trimming as I went - quite simple to do. I decided I wanted my grille flush rather than overlapping and so I attached it using a glue gun. There is no future access issue on this part as it just lifts off easily so permanently fitting a grille should be no issue. See photo below - which if you click on will enlarge and if you use the Ctrl Key and Scroll on your mouse you can zoom in even further for a good look!

The second grille I intend to fit will be over the opening to the fan motor which is in the bulkead just below the drain hole mentioned above. I have cut a flat section of grille (approx. 9 inches by 4.5 inches) and I am ready to install this tomorrow though I haven't decided yet how to fix this - as a permanent fix could cause access issues at a later date. Will perhaps add a photo tomorrow.

Started looking for other drain holes too - I have found what look to be 2 - either side of the rear windscreen which can be seen with the boot open. Haven't had a chance to check them yet - I suspect there should be others around the front roof to windscreen seal and others in the doors.

Any more help and pointers with this would be gratefully received. Maybe then a definitive list of 171 drain holes can be drawn up and perhaps placed in a sticky?

I am unable to put my fan motor cover grille in place as I cannot pick up the magnets for it - I have ordered four tiny but stong magnets from Maplins at around ÂŁ1.79 each. Have also printed out and then clear laquered some small Merc logos. I will glue the magnets within the grille using a hot glue gun and then cover the magnets with the logos (very similar to the way Etyu has done).

Photos attached shows one straight on where the logo hardly shows the other from around 45 degrees which shows it up better. Just a simple MB Star stencil placed over before painting. Looks OKish.
 

Attachments

#10 ·
As this thread is the closest thing to the drain hole issue for the r171, I will move it to the r171 diy section and sticky it until something better comes along
 
Save
#11 · (Edited)
Save
#13 · (Edited by Moderator)
It looks like the battery compartment cover is different in right-hand-drive R171 than in left-had-drive R171.

Image
 
  • Like
Reactions: Squishband
Save
#14 · (Edited by Moderator)
Some photos of drain areas in the R171

In the engine compartment: AFAIK there are four (two at each end of the front windshield/windscreen area, third inside battery compartment and a fourth off-center towards the battery side near the base of the windscreen wiper motor). Photos are of LHD R171 (may be different in RHD vehicles).
~original

Image


The left hand side (right side in photo) drain opening is basically a slit following the series of blunt looking directional vanes.

Image


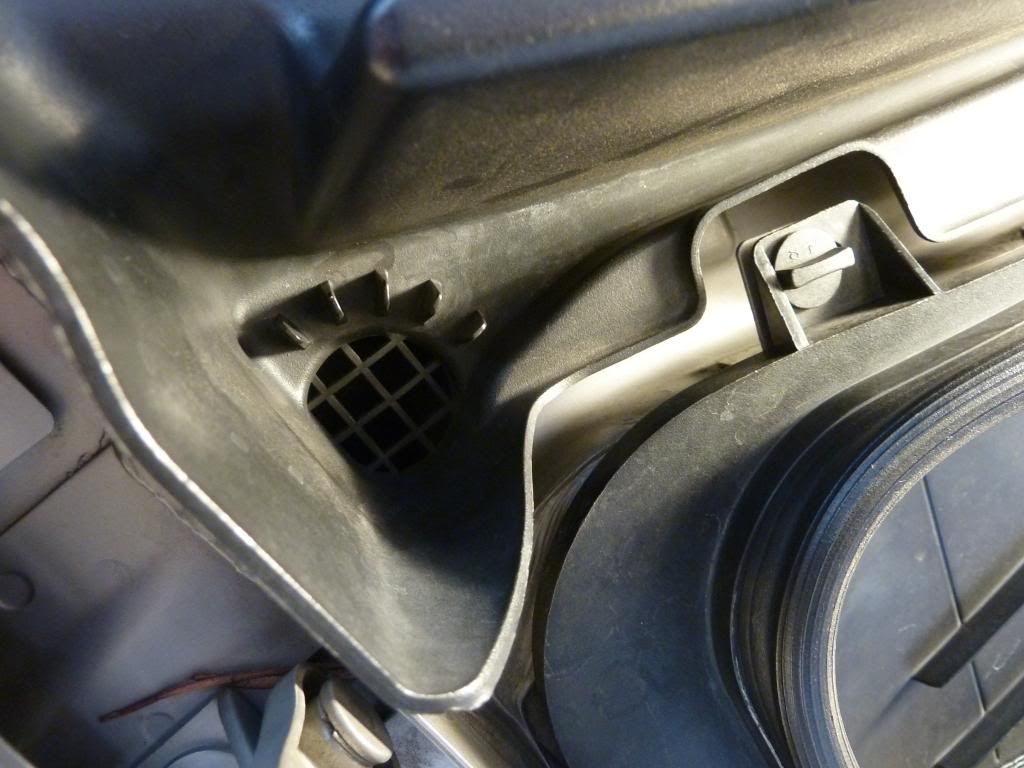
Close up of the one at the right front windscreen area, behind the battery compartment cover:

Image


The middle one near the base of the central windshield/windscreen wiper motor arm:

Image


Inside the battery compartment:

Image


In the trunk/boot compartment: the drain holes are more accesible when the roof is partially retracted using John's broomstick method. The drain holes are at the rubber seal area at the lower border of the C-pillar.

Image


With roof partially retracted and looking down from the side of the vehicle at the C-pillar area, photo below shows the flexible rubber tubing :

Image


View of the drain opening at the bottom of the C-pillar:

Image


Reserve pics attached in case of PB loss:


Save
#36 ·
In the trunk/boot compartment: the drain holes are more accesible when the roof is partially retracted using John's broomstick method. The drain holes are at the rubber seal area at the lower border of the C-pillar.

Image
Do you know where do this hoses go underneath the car?

I have my left drain hole clogged. Removed the hose which was clean, and cleaned a lot of leaves and mud from the hole in the car, but water still doesn't run down there.
I tried unclogging it with the antenna (I know...) but it won't go through more than 1 inch or so.
The right one is clean and I can insert the antenna completely, but can't see where it leads underneath the car.
I will try to clean it from there, but don't know where to look.

Thanks
 
#15 ·
Eddy - thanks for the further pointers on the drain holes. It was dark when I went out to have a look but I located the left side drainage hole (RHD looking from the front) so it seems it is confirmed that RHD and LHD cars look to be a mirror image of each other and the 'edition' of the car appears to make no difference.

There is a drainage slit behind the three 'humps'

As you can see mine is largely clogged with leaves and muck - so that is a job for tomorrow in the light. I reckon I'm going to have to check these regularly as we are surrounded by tall trees here and the way the wind circles outside we get most of the leaves on our driveway.
 

Attachments

#18 ·
Eddy - thanks for the further pointers on the drain holes. It was dark when I went out to have a look but I located the left side drainage hole (RHD looking from the front) so it seems it is confirmed that RHD and LHD cars look to be a mirror image of each other and the 'edition' of the car appears to make no difference.

There is a drainage slit behind the three 'humps'

As you can see mine is largely clogged with leaves and muck - so that is a job for tomorrow in the light. I reckon I'm going to have to check these regularly as we are surrounded by tall trees here and the way the wind circles outside we get most of the leaves on our driveway.
:eek: :eek: :eek:

That is painful to see. North American R171 have four stubby vanes :biglaugh:

I've updated the link above with photos of drain points in the boot/trunk area: http://www.slkworld.com/slk-r171-class-diy/105562-drain-holes.html#post996418


If one looks and feels beneath the slit-like opening, one will notice a funnel-like plastic structure that then drains to the respective fender area.
 
Save
#16 ·
Within six months of buying my SLK, water flooded into the car on the passenger side. I wondered what on earth was going on. Every time I accelerated, water flooded into the footwell. Traced it to the battery compartment drain being blocked and the battery coimpartment was full up with water, right to the terminals!!. Stuck a long thin screwdriver down the drain to clear. Fortunately no electrical problems, but wasn't too impressed that the drains had not been checked by the main dealer....
 
#19 · (Edited by Moderator)
Eddy has it right, apart from the drain in the centre of the scuttle panel on a RHD car (where the battery box meets the scuttle....) There are three drain points on RHD cars in this area...

There are also a couple (one each side) near the boot seals on the rear wing - see the pics for a better description and idea of where they are...) They are the larger of the two holes - the inboard ones.....
Note-Imagshack no longer shows photos
Uploaded with ImageShack.com
Cheers
Sean
 
Save
#20 ·
Eddy/Sean,

I went to my dealership today and despite them previously promising a technician would give me a couple of minutes of his time they were 'too busy' today. Wish they had told me and i could have gone another day - so thanks Sinclair Cardiff.

The service desk guy did come back to me to say there are only 2 holes either side in the scuttle and another in the battery box. I cleaned out my blocked slit one (and yes Eddy there are 4 humped vanes just the angle of my picture had the last one obscured by the rubber seal) today and cleared it through with some hot soapy water. Despite a good look for a third drain in the scuttle area near the battery cover I could not find one. Sean can you supply a photo?

Have found the two photo'd by Eddy maybe around 20 inches either side of the centre point set in the boot (trunk) seal just below the rear windows that run into 2 very visible plastic pipes that run towards the rear of the boot (trunk). I'm going to check out the larger of what appear to be 2 drain holes which are either side of the rear screen at its widest point and visible when you open the boot.

This is becoming something of an obsession!!

Thanks all.

Steve
 
#21 · (Edited by Moderator)
I'll take a bigger snap tomorrow when it's light, but what I have is as follows

The drain on the left (as you're looking at the car from the front) - Just above the front SAM cover - the 'slit' one that Eddy mentions - on the left on a RHD car - no pic of this yet.

The 'centre' drain - on the left of the battery box, along the scuttle panel, as viewed fron the front
Note-Imageshack no longer shows photos


Uploaded with ImageShack.us

The 'right' drain - on the right of the battery box, again along the scuttle panel...


Uploaded with ImageShack.us

Including the one inside the battery box, that makes 4 across the front.

If you head to the rear there are the two in the boot (trunk) 'gutter' - the larger inboard holes (better pic needed - will take tomorrow, but when you pour water into them, it comes out underneath the car...) and the two under the rear window with the ribbed flexible pipe...

Looks to be 8 in total

The plot thickens!!

Cheers
Sean
 
Save
#22 ·
Thanks for the update. I will try to take more photos of the 4th drain point at the front of the R171.
 
Save
#24 ·
Save
#23 ·
Thanks Sean for the confirmation of the 4th drain hole in the front of the car (3rd on the scuttle).

Checked mine out and as you can see in the first picture it was completely bunged up. Second picture after I have cleaned out the gunk with a sharp implement and poured a couple of pints of hot soapy water down the hole to reveal a criss cross grid and now clear.

I'd recommend all to check these out as you don't want a scuttle full of water pouring into the electrics.

Image


you can see the drain hole a lot clearer here

Image


I also took the opportunity to fit my grille to protect the opening to to the fan motor - I don't think it looks too bad. Thanks to etyu for the inspiration.

Image
 

Attachments

#25 ·
Been having damp passenger carpet under heater issues (lhd) on my '07 r171. Info from the forum really useful, thanks.

Flushed through rear drain holes too. Small rubber grommet over hex shaped small hole just to one side of the rear drain inlets have come apart. Anyone know what the hole and grommets are for? Left open, will water in the boot lid gullies enter the hex holes and boot or inner wing etc.?
 
#26 ·
By the drain holes at the top of the boot lid gullies, under the rear window lower corners are two mystery (to me) hexagonal holes. Each hole protected by a grommet. These grommets have come apart so beginning to wonder, do these holes lead into the rear wing void? If that is the case will water find its way into places it shouldn't be?
 
#32 ·
Just checked mine wit a torch.

I have a rubber ring surrounding, pretty much the shape and size of a polo mint.
No wires etc.
Looks too high for a drain hole.
 
Save
#33 ·
I thought exactly the same when I looked at it because of the height.

Guessing it's a wheel off and arch liner out job.
Something to do on a cold day in winter (not) as would prefer to know it isn't going to cause any future problems.
Will try and post pics if and when it gets done as the other side's rubber is only hanging on by a slither.
 
Status
Not open for further replies.
You have insufficient privileges to reply here.