Mercedes SLK World banner
Status
Not open for further replies.

Mesh to keep leaves/debris out of cabin fan intake

71K views 104 replies 46 participants last post by  Beppi  
#1 · (Edited by Moderator)
NOTICE: if pics are blurry, search and download and install in your browser
photobucket blurry fix or similar


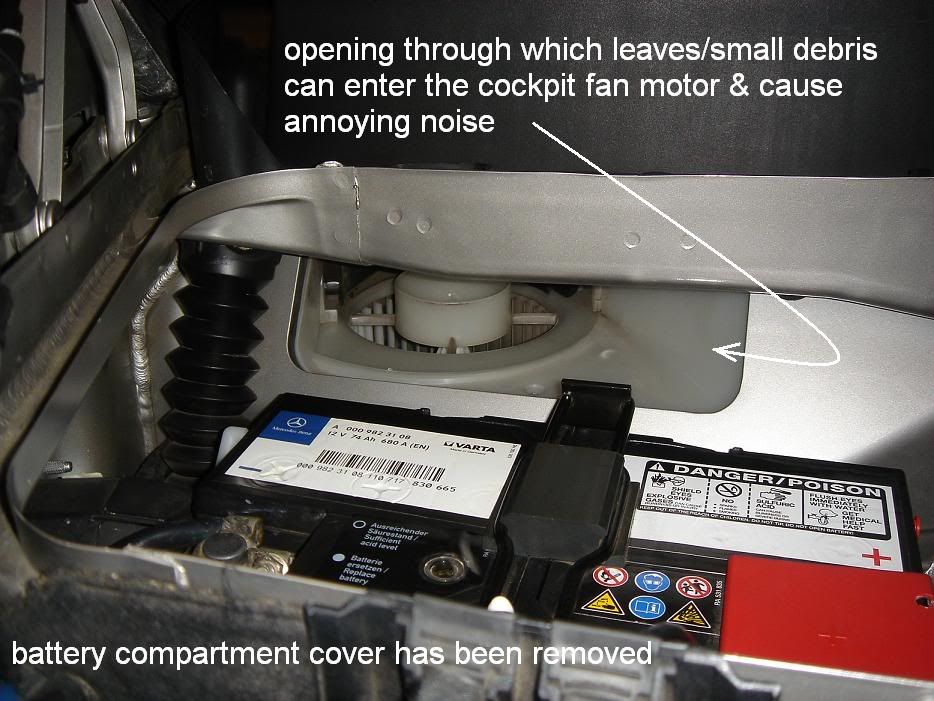
There were a couple of posts about noisy cabin/cockpit fan motor due to leaves which got me thinking.

This is what I came up with today. I hope it will help reduce the risk of leaf/debris ingestion. I've driven the car for some short trips (non-spirited) today after "attaching" the mesh and it had stayed in place. I'll see how it holds up in the next 7 days, including the meet this Saturday (Dec. 5th) and report back.


Below is a photo of the air intake to the cabin/cockpit fan motor:

Image


Pix below shows the mesh in place:

Image


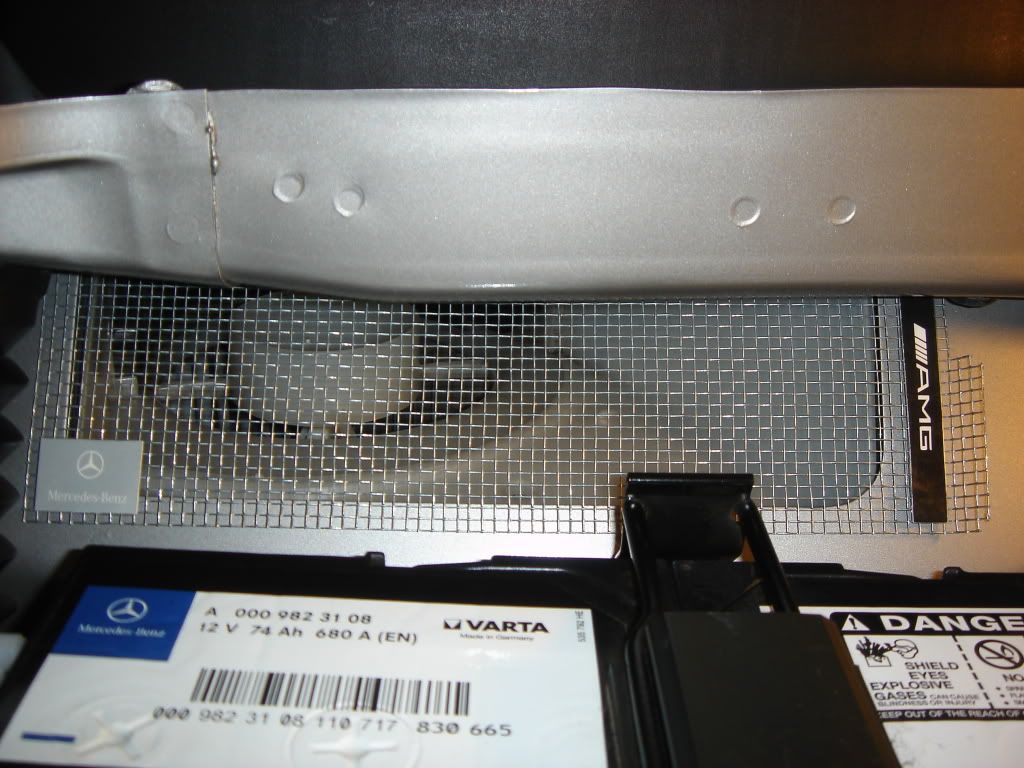
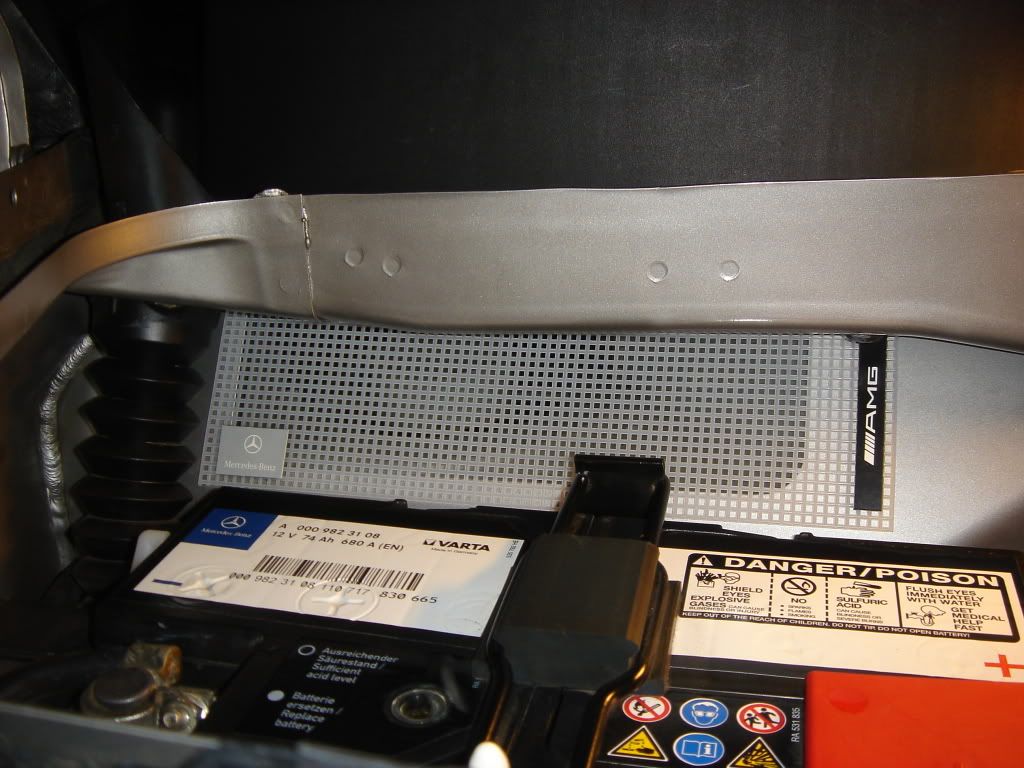
Photo of galvanized steel screen version:

Image
 
Save
#2 · (Edited by Moderator)
Here's how to assemble the mesh

Cost is USD $4 (including sales tax) for the purchased materials, and you have enough to make two units. The others were scavenged/left-overs.

Materials:

1. Plastic/nylon mesh (stiff or rigid type) found at craft stores, e.g., Michaels, at the knitting section; cost $ 0.39.
2. Strong small magnets (not the strip type as they're weak magnets), 13 mm; cost $ 3.26
3. Five-minute epoxy (left-over from other projects)
4. 27 cm-long straight wire (from coat hanger)
5. Fishing line/nylon (to tie the straight wire to the mesh)
6. Left-over heavy card MB/AMG brochure (need the printed logos)

Image


Method

Cut the nylon mesh to 10cm x 27 cm size. The nylon mesh is actually 27cm square (so one can actually make 2 units)

Attach/glue the strong 13mm magnets (I used 3 magnets) to one side of the plastic mesh as shown below, using 5-minute epoxy (I've used this to reattach a 2x4 inch chip that came off a brick in the yard and it has held up to wind and sun for the last year so I figure it may hold okay):

Image


Attach cut cardboard logos on the other side of the mesh using the same glue.

Image


Attach the straight wire to what is the upper edge of the mesh on the same side as the logo, using fishing line/nylon. The reason: the mesh is not rigid enough and the upper edge of the air intake opening has no "lip" on which the mesh can rest on and the mesh may bend slightly at the upper edge.

Image


Photo of "attached" mesh:

Image


I hope the above is useful/helpful. Comments and suggestions welcome.
 
Save
#4 ·
:biglaugh: Just change the long rectangular cardboard logo to one that states Mercedes Benz instead of ///AMG and it should fit non-AMG R171:biglaugh::biglaugh:.
 
Save
#12 ·
The red + battery terminal cover/cap is mainly just wedged in by 2 legs, and it is not a routine habit for most individuals to open up the battery compartment cover and check inside the battery area.

Prolly all the more reason to have this modification.

I'll report back when I have done an aluminum mesh screen instead of the plastic one.
 
Save
#13 ·
The mesh held and stayed in place (no displacement, not even by 1-2 mm) with just the strong magnets despite the many twists and turns at our Malibu meet and drive today.

Cyberdrakon suggested to use a mesh on the opening at the battery compartment cover itself instead of at the inlet. I had thought about doing this initially but though it requires a more complex shape and bending and this seemed like an easy one to do. Nonetheless, I'll plan on making a template of the battery compartment cover opening and see what can be accomplished.

Anyone knows where to get a fine wire mesh made of slightly thicker wire and not sold in rolls like in most hardware stores?
 
Save
#14 ·
Great to see this mod progressing, I might be interested in doing this myself with a metal one. Specially because I imagine if I get neodymium magnets it wouldn't even need glue! ;-)

I have no idea where to get such mesh/grill though. Please keep us posted!
 
#19 ·
Where can one get the small neodymium magnets?
 
Save
#16 ·
I second Adamantium. I feel the openings are too small, and it will definitely affect the air flow.

I have an R170 and I don't know much about the engine compartment of the R171, but I believe that you should have the mesh positioned in a more accessible location since you would have to clean it every once in a while. Leaves would eventually restrict the airflow, and if they start to decay...
 
#26 ·
The air has to pass through a pollen filter which is far more restrictive :) -
So two restrictive filters instead of one!

Great!

I say use chicken wire!

BTW, to the OP. Thanks hugely for posting this. It enabled me to quickly fix the noisy fan noise on my sister's car. Having never noticed that inlet under the battery cover before, thanks to your pic I knew what to do.
 
#18 ·
I am thinking of a way to use wire mesh that is moderately rigid and sturdy with 3 mm openings, either on the opening as illustrated or on the opening located at the battery compartment cover (although this one will require a more complex shape and some precise bending and cannot be attached with strong magnets). I need to keep looking around for a good source of wire mesh.

The air flow inside the cockpit/cabin with the plastic mesh as shown was not affected after 7 days of daily use.
 
  • Like
Reactions: Squishband
Save
#22 ·
Great mod Eddy! What about cutting a piece of a furnace filter or similar to cover the opening. Some of those electrostatic filters have a nice diamond metal lath on both sides which might work well. It's gonna run you more than $5.60 though :)
 
Save
#23 ·
I'll check the local hardware stores this weekend.
 
Save
#24 ·
The grille on the hood is the first "filter."

One could just as easily put some screen on the underside of that.

If instead you put in in the box as suggested, you've just created something that needs to be cleaned. At some point small stuff will just go through the system and drain to the ground with no problems.
 
#25 ·
  • Like
Reactions: Slkoko
Save
#29 ·
Just ordered on the phone

Check McMaster Carr for your hardware needs. Their located in the City of Industry.
Thanks Tom,

Just ordered the wire mesh part no. 9217T43 with the following specifications:

Welded wire square openings, opening size 8x8 per inch (1/8" x 1/8"), galvanized steel, the wire is AWG 27 or 0.017", percentage opening is 74%. I'm planning to cut 10cm x 25cm rectangular sheet (the stock size is 36", no minimum order, so I ordered 36" long or 9 sq ft at USD $0.78/sq ft, shipping is roughly USD $5).

I need a structural engineer (hint to Tslick) to calculate and see if this sheet (10cm x 25 cm) is going to be rigid enough for the opening with the same magnet positions and not need heavier gauge wire reinforcements on the borders. Thank you in advance.
 
Save
#31 ·
I'm sure it would be fine, but it will be flexible like any window screen.

I'd prefer the plastic since it's more rigid. I'd pick PTFE (polytetrafluoroethylene), high temperature and chemical resistant and fairly rigid. The life span would be longer than the cars life.

I'm assuming the mesh you purchased at the fabric store is polyester. I'd say it's fine since there's no direct sunlight. The problem would be high temperature exposure but the location in the engine bay should not be that hot.

Best Auto Insurance | Auto Protection Today | FREE Trade-In Quote
 
#32 ·
Cool, learning more stuff everyday

I'm sure it would be fine, but it will be flexible like any window screen.

I'd prefer the plastic since it's more rigid. I'd pick PTFE (polytetrafluoroethylene), high temperature and chemical resistant and fairly rigid. The life span would be longer than the cars life.

I'm assuming the mesh you purchased at the fabric store is polyester. I'd say it's fine since there's no direct sunlight. The problem would be high temperature exposure but the location in the engine bay should not be that hot.
Cool. Learning more about applied materials :tu:

The initial mesh as pictured on the first post held up pretty well after 1 week of use and that included the Malibu run on December 5th.
 
Save
#33 ·
Cat pee in mine

While I haven't had leaves get In the fan yet, a bout a week ago I looked out my office window to see a big black cat sitting on my hood :( I've seen it since sitting on several other cars in the lot as well.

So I started smelling this animal smell (pee) in my car and i was wondering where the heck it was coming from. I finally traced it back to the vent and then to the battery compartment. Evidently, when the cat was on the hood it decided to pee in the vent.

I just poured some pet oder eliminator through the drain and left a soaked rag next to the battery to try and kill the smell.

The cat's in trouble next time I see him :tazz:
 
#34 ·
While I haven't had leaves get In the fan yet, a bout a week ago I looked out my office window to see a big black cat sitting on my hood :( I've seen it since sitting on several other cars in the lot as well.

So I started smelling this animal smell (pee) in my car and i was wondering where the heck it was coming from. I finally traced it back to the vent and then to the battery compartment. Evidently, when the cat was on the hood it decided to pee in the vent.

I just poured some pet oder eliminator through the drain and left a soaked rag next to the battery to try and kill the smell.

The cat's in trouble next time I see him :tazz:
:biglaugh: I know it's not funny if you're the one affected but look at the bright side, mice will NEVER come near your car.

Perhaps use a low flow of water through the drain to rinse out/dilute out the urine smell. Maybe use 200 ml of clean water to the rear of the battery compartment , microfiber at the front and some compressed air from the rear to direct water to the front.
 
Save
#36 · (Edited by Moderator)
Galvanized steel mesh

Below is a photo of an updated (galvanized steel) mesh to protect from FOD to the cabin air intake. The mesh is rigid enough to not require a larger diameter wire as support at its upper border. It is constructed in the same way as the plastic mesh. A small tab (bent about 30-45 degrees) is incorporated to the wire mesh at the right lower corner to make lifting and removal easier (these magnets have good strength). Logos are for looks only and to cover up the magnets on the underside.

Image
 
  • Like
Reactions: Slkoko and Dave54
Save
#42 · (Edited by Moderator)
Update: It hasn't moved

Below is a photo of an updated (galvanized steel) mesh to protect from FOD to the cabin air intake. The mesh is rigid enough to not require a larger diameter wire as support at its upper border. It is constructed in the same way as the plastic mesh. A small tab (bent about 30-45 degrees) is incorporated to the wire mesh at the right lower corner to make lifting and removal easier (these magnets have good strength). Logos are for looks only and to cover up the magnets on the underside.

Image
After 2 weeks of driving, the galvanized steel screen at the cabin fan air intake has stayed in place.
 
  • Like
Reactions: Phil1987uk
Save
#37 · (Edited by Moderator)
I am so "meshed" up

Below is a piccie of galvanized steel mesh incorporated unto the battery compartment cover.

Image


I will post how-to photos later tonight. Gotta run some errands.
 
Save
#38 · (Edited by Moderator)
Here's the "meshy" details

After giving some thought, I decided to do a full width mesh on the rectangular opening at the top and front of the battery compartment cover.


A rough pattern/template was started after some preliminary measurements, adding small pieces to the sides and trying to countour the rounded corners (used a disposable clear drinking plastic cup as a template for the curves). Photo below show the initial rough pattern/template (put together with clear packing tape):

Image


I decided to add a 1/2 cm area on the template to act as a lip on the upper border.

The pattern was then transferred to the galvanized steel wire mesh. Template was taped to the mesh (same clear packing tape), and thankfully a strong heavy-duty scissor was handy for cutting. The rough shape was cut with heavy scissors, finer cuts were made using a motor tool. (Do be VERY careful and exercise caution when cutting as the edges can hurt you like a sharp needle. Always wear protective eye wear during the entire process.) Sharp edges were sanded down (with motor tool), and the fold lines were marked.

The cut mesh was then made flat with a rolling pin (used without the mate's knowledge :D), rolling from different sides and turning mesh over, etc, until it was flat and straight. Fold lines were marked. Folding was effected by using two metal straight edge/rulers. This way the fold line is straight. One may also decide to "anneal" the fold line with a small candle to make bending easier. I didn't, as I didn't want to blacken the silver-colured mesh. A fair number of test fits and adjustment cuts were made.


Below are two photos of the mesh attached to the battery compartment cover opening. I thought it looked almost OEM:)

Image


Image


The mesh is then finally anchored by tying it down with fishing nylon at 2 points (pre-moulded tabs).


Next 2 photos show the detail of the fishing line ties:

Image


Image


Here's the final pattern with notes. I will send this to anyone who is interested and then have it passed around and across the pond to our friends in Europe.

Image


Finished product installed in vehilce:

Image


Note: The AMG and Mercedes Benz logos are just for aesthetics.

Hopefully this modification will help members that live in "leafy" areas and help reduce the chance of leaves and other debris from clogging up drains, or getting to the cabin fan intake causing unwanted noise or chatter.

I think I'm what you call "meshed" up:biglaugh:
 
Save
#40 · (Edited)
Quite sorry, don't have a scanner


Thanks John. Unfortunately, I don't have a scanner, and also don't know how to convert a scanned file (in Windows XP) to a PDF file. PM me the "addy" and I will mail it (template).


Edit: PDF now available.
 
Save
#43 ·
As usual, very well done Eddy!:tu:
 
Save
#45 ·
pdf of template, battery bay screen

Bought a scanner today (HP) for $60 at Costco.

Here's the pdf of the battery bay galvanized steel screen. Hope members find this useful.
 

Attachments

Save
Status
Not open for further replies.
You have insufficient privileges to reply here.