Mercedes SLK World banner
Status
Not open for further replies.

DIY : R171 : Holding Roof Open : "Broomstick" modification

87K views 69 replies 34 participants last post by  jbanks15  
#1 · (Edited by Moderator)
Image
Image
Image


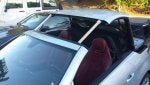
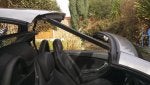
Many thanks to John's (UK-C200) narrative on the "broomstick" method to prop up the retractable roof (so some minor lubrication and cleaning work can be done), I have scavenged some left-over material at home and now have a "broomstick".


I'd like to name it after John but don't know what to call it without causing a lot of unusual comments :biglaugh: John's Broomstick perhaps?

Anyhow....

Materials (all scavenged):

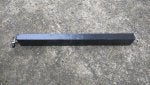
1. 16 inch long (3/4-inch square in my case) wooden stick or broomstick.

I found out through John's narrative that 16 inches is the distance (from the back edge of the front windscreen frame to the front border of roof) at which the partially retracted roof will stay balanced, i.e., not move forward nor backward when the hydraulic pressure to the partly open roof goes to zero.

2. Rubber leg tip (7/8" or 22 mm diameter in my case), you only need one (available at hardware stores in different diameters, I happen to have some spares)

Tools:

1. Small hand saw
2. Drill with 1/4" (6.4mm) drill bit, a slightly larger drill bit will also be fine
3. Motor Tool (optional)

Method:

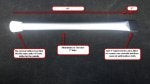
1. Cut the broomstick or wooden stick to the specified length of 16 inches (41 cm), or a tad shorter. If you have a square wooden stick, round off the square profile so that it is round at one end (so it will accept the rounded rubber leg tip). Drill a 1/8 to 1/4 inch hole (following the longitudinal axis) about 1/2 to 3/4 inches deep (3-4 cm) at this end. In my case I enlarged the hole moderately with a motor tool, so that only the rubber leg tip is engaging the guide pin on the front edge of the roof and not hitting the wood (not a significant thing).

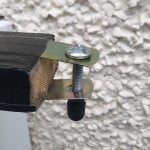
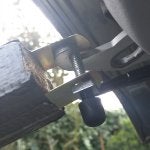
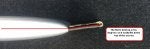
2. Drill a similar hole on the round rubber leg tip. See photo below:


3. Insert the rubber leg tip to the end with the drilled hole.


This will allow the tool to engage the guide pin located at the front edge of the retractable roof.


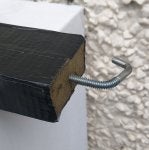
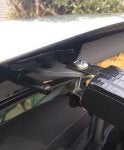
4. Cut out a 2cm x 1.5cm notch at the other end of the stick. This will allow the stick to rest at the front windscreen frame at the metal latch area.


Disclaimer: This is not an approved method by any means. Do this at your own risk and there is potential for serious bodily injury.


To use this broomstick tool:


Vehicle on level ground. Main windows should be down. Engine off.

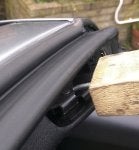
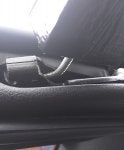
Partially retract the roof to a point just beyond the 16-inch distance (say 18 inches) using the IR function of the remote key or center console roof control button. Position the tool with the hole at the rubber tip end lightly engaging the guide pin. Position the notched end at/near the area where the guide pin slides into, next to this is a small squarish metal plate. This is where I place the notched end.

In a few short moments when the hydraulic pressure drops, guide the roof forward with one hand while the other positions the tool. As John stated, the roof is very well balanced and can be coached to move forward or backward with mild to medium strength or force (prolly 10-15 lbs).

After you're done with the work, retract the roof (again with engine off), while holding on to the tool with one hand; remove tool as soon as it is disengaged.

Warning: Frequent operation of the roof with the engine off does drain your vehicle's battery.

I hope the above is helpful. I plan to use this tool when doing minor cleaning and lubrication of the rubber seals.
 
Save
#2 ·
Awesome as usual Eddy! "John's Broomstick" does sound a bit odd, but hey, it's better than "John's jury-rigged roof suspension system"! ;-)

I really like your idea of the rubber tip for the end - I'm going to have to incorporate that into mine.
 
#7 ·
Try lubricating the latch mechanism of the boot/trunk lid (when opening it the usual way to get into the boot space) with lithium grease. IIRC this is a hinge point when the boot lid opens rearward to accept the retracting roof.

I, however, do not know where to lubricate the major hinge area at the sides.
 
Save
#10 ·
PVC is OK too. It's mainly the whole concept/idea of fabricating something that works reasonably well, without spending a lot of money.
 
Save
#13 ·
Well I decided to make my own 'John's broomstick'

and I was going to use it today, but I decided it was to wet and would take too long to dry, so I'll have to do the lubricating another day (it was only 8 degrees centigrade).

So I made it anyway, and tested it out on the roof, it all went well you'll be pleased to hear.

Anyway I used a cutoff from an old metal extending pole which we used to use to hold the washing line up (don't tell the wife I stole 16" of the end).

I then put a pad on each end (the kind you put under furniture legs) with double sided tape, and then held that all on with some electrical tape. I also cut the required hole in the end for the location pin.

Etyu, in your instructions you mention
2. Drill with 1/8" (6.4mm) drill bit, a slightly larger drill bit will also be fine
Which confused me for a bit, as 6.4mm is 1/4" not 1/8"... as you have in the instructions...lol

Anyway, thanks to your instructions all went well and here's my 'John's Broomstick'

 
#14 ·
Etyu, in your instructions you mention


Which confused me for a bit, as 6.4mm is 1/4" not 1/8"... as you have in the instructions...lol

Anyway, thanks to your instructions all went well and here's my 'John's Broomstick'

View attachment 13758
You are right. The original post has been corrected to reflect 1/4". Thanks.

Let us know if the Mrs. ever notices that the pole is 16-inches shorter :biglaugh:
 
Save
#16 ·
Here is a CDN version of the same installation
What I did different:

- I used a 3/8" hole: Giving a bit more flexibility in the angle adjustment of the stick
Image


- I used 2 sticks: I did not like the flexing of the roof top when cleaning the opposite side
Image


- I did not protect the sticks: Given the good balance of the roof (so its already a light weight on the sticks) and making sure the windshield side of the stick is small enough as to not contact the rubber, I did not think it was necessary
Image
Image


- I have the size set to 15-3/4" : Giving a bit more weight on the roof to stay open.
Image


Enjoy
 
Save
#19 · (Edited)
So THAT'S what you guys do with all of those broken Hockey Sticks ! :)

Priceless.


Sent from AutoGuide.com Free App
 
Save
#26 ·
Old thread but new to me for my new (to me) R172:

I read the method but at the point when you're done cleaning and it's time to remove the stick, do you use the fob button/handle to "electrically" continue opening the roof (ie: continue opening the roof where you left off) or do you move it open by hand? First time I'm lowering it in this manner and want to do it correctly.

Tks.
 
#27 ·
I no longer have my R172 but I do have an R230 and still use the same "broomstick" method. When it is time to remove the sticks I get a second pair of hands and remove the sticks while holding the roof in place. Then I gently let the roof slide forward into the closed position (it will not latch). Once it is closed I then use the electronic method to open the roof and then electronically close the roof again to verify it will latch closed.
 
#29 ·
I made myself a broomstick tool today after coming across the excellent guide on this forum, then lubed all my rubbers and hinges.
I made slightly different ends on my roof tool. But please don't think I was trying to better the original one because it's obviously well tried and tested and I am no engineer.
I've seen a picture somewhere on here of the official MB tool and noticed it actually secures to the car at both ends. So rather than just rest mine on I wanted it to hook on at both ends because I was worried about accidentally knocking it away whilst moving around the car.
I didn't actually use a broomstick because I found a suitable length of scrap wood in the shed.
So the pictures below show what I came up with and it worked really well, preventing the roof from going forwards or backwards once the tool was in place.
I even wrapped it in tape to make it look better as well.
 

Attachments

#30 ·
Just thought I would drop in a couple of pictures of the roof support I made using a 1" aluminium pole, you could just as easily use a chrome shower pole or clothes pole.
I made mine 16" in total length with the last 1" squeezed flat so it fits into the top of the screen.
The flat end was filed so the corners were nicely rounded and then wrapped in leather cloth so it wouldn't mark the car.

A big thanks to all who posted their ideas which helped me make my own roof support.
 

Attachments

Save
Status
Not open for further replies.
You have insufficient privileges to reply here.