

After a recommendation from jbanks15 and reviewing posts here and online, I ordered a CarNaviPlayer head unit for my 2005 SLK, which has the basic sound system. Here is my experience.
TL;DR:
This post allows only ten pictures. There are many more in my gallery:

Most pictures have embedded text to help identify contents and connectors.
The package was extremely well wrapped. Included: the head unit, main wiring harness, USB wiring harness, radio antenna connection, GPS antenna, a secondary wiring harness for extra speakers (not used), and a Velcro pad (not used).
NO instructions were included and none can be found on the web site. Fortunately, several forum posts (in particular, https://www.slkworld.com/threads/installing-the-carnaviplayer-head-unit.557105/#post-4645969) and reviews on the web site (Reviews: Mercedes-Benz SLK-Class (R171) 2004-2010 radio upgrade) include enough clues to make the install manageable. It seems that the manufacturer has made improvements that removes some of the pain points mentioned in those videos. Everything seemed well thought out. No cutting or soldering of wires was required.
The Install
Time to install: two hours elapsed time
Tools required: T20 Torx screwdriver, small flat screwdriver or pry tool
I set up a work light, though a flashlight or headlight would do. I took pictures of every step, both for this post and in case there was an important detail that I missed when disassembling.
Head unit has two screws sticking out the top, apparently to secure the DVD player for shipping. These must be removed, which can be done with fingers.
Remove the old unit. This YouTube video provides good guidance:
It shows a manual transmission. I have an automatic, removing the shift knob is a little different: pry out the rectangular panel around the shift boot, roll the leather up over the knob, find the black plastic nut on the underside of the leather, rotate it counter-clockwise (looking from above) about 1/4 turn, pull off the knob from the metal shifter post, be careful not to pull too hard/far due to connected wires. (The black nut was difficult to turn by hand, so I used pliers. Very gentle grip and twist was sufficient.) Disconnect the two wiring harnesses.
![Image]()
Engage the hand brake to get the handle out of the way. Remove the plate that runs from under the ash tray to the hand brake. I was able to do so by gently lifting in the opening for the shifter. Pry tool may help around the edges. Gentle! Unlike in the video, I left the wiring harnesses connected and just hung the plate over the edge of the console.
![Image]()
As video shows, remove screws from ash tray and lighter, wiggle the assembly out. Again, leave wiring connected and hang over the side.
Remove the HVAC controls and button panel, hang them aside.
![Image]()
![Image]()
Remove cup holder, set aside. These two screws seemed to have slightly narrower heads, keep them apart from the others.
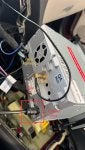
The main event: remove the four screws and the head unit. I took a picture of the wiring before disconnecting it. The main harness has a lever on the top that rotates towards the rear before it will release.
![Image]()
For the GPS antenna, I removed the top grill housing a speaker and HVAC vents. It is held in by a few clips. Lift the front slightly, then pry along the edges of the top surface, pull toward you. The antenna fits on top of the vent, right of center. Run the wire behind various support pieces to where the head unit goes. There is lots of wire, I stuffed it in beside the antenna. I removed the backing paper and stuck the antenna to the top of the vent structure so it wouldn't fall down inside somewhere.
For the USB-A outlets, I put them near the mesh in the passenger footwell and ran the wire through the side panel opening into the area where the head unit goes.
Connect the GPS antenna and USB cable to the head unit. Attach supplied antenna cable adapter to the car's connector and to the head unit, plugging the antenna male plug to the marked hole on the bottom corner of the head unit. (It doesn't look like a plug receptacle, but the plug fits in there. There is a label on the HU.)
Finally, connect the main wiring harness to the car's big harness, then to the HU.
![Image]()
![Image]()
Connect the GPS antenna and USB cable to the head unit. Attach supplied antenna cable adapter to the car's connector and to the head unit, plugging the antenna male plug to the marked hole on the bottom corner of the head unit. (It doesn't look like a plug receptacle, but the plug fits in there. There is a label on the HU.)
Finally, connect the main wiring harness to the car's big harness, then to the HU.
BEFORE reassembling, test! Slip the HU back into the audio stack. Turn the car to ON or ACC position. The unit will boot up. (It's not quick, but there's a thrill when the first splash screen image shows.)
I played with the GPS to ensure it found my location, and scanned the radio frequencies. I then paired my iPhone. The unit's name is HLA and the pairing code is 0000.
Everything seemed to be working, so I put everything back together. I, too, dropped one screw, and one plastic cover plug failed to reappear, but it otherwise went back together easily. Remember to reconnect wires at each stage, especially the two harnesses that go to the shift boot assembly.
![Image]()
More images in my gallery:

Snags:
First impressions:
TL;DR:
- Generally good, looks great, works pretty well, major improvement
- Reasonably easy to install (two hours elapsed time)
This post allows only ten pictures. There are many more in my gallery:

Most pictures have embedded text to help identify contents and connectors.
The package was extremely well wrapped. Included: the head unit, main wiring harness, USB wiring harness, radio antenna connection, GPS antenna, a secondary wiring harness for extra speakers (not used), and a Velcro pad (not used).
NO instructions were included and none can be found on the web site. Fortunately, several forum posts (in particular, https://www.slkworld.com/threads/installing-the-carnaviplayer-head-unit.557105/#post-4645969) and reviews on the web site (Reviews: Mercedes-Benz SLK-Class (R171) 2004-2010 radio upgrade) include enough clues to make the install manageable. It seems that the manufacturer has made improvements that removes some of the pain points mentioned in those videos. Everything seemed well thought out. No cutting or soldering of wires was required.
The Install
Time to install: two hours elapsed time
Tools required: T20 Torx screwdriver, small flat screwdriver or pry tool
I set up a work light, though a flashlight or headlight would do. I took pictures of every step, both for this post and in case there was an important detail that I missed when disassembling.
Head unit has two screws sticking out the top, apparently to secure the DVD player for shipping. These must be removed, which can be done with fingers.
Remove the old unit. This YouTube video provides good guidance:
Engage the hand brake to get the handle out of the way. Remove the plate that runs from under the ash tray to the hand brake. I was able to do so by gently lifting in the opening for the shifter. Pry tool may help around the edges. Gentle! Unlike in the video, I left the wiring harnesses connected and just hung the plate over the edge of the console.
As video shows, remove screws from ash tray and lighter, wiggle the assembly out. Again, leave wiring connected and hang over the side.
Remove the HVAC controls and button panel, hang them aside.
Remove cup holder, set aside. These two screws seemed to have slightly narrower heads, keep them apart from the others.
The main event: remove the four screws and the head unit. I took a picture of the wiring before disconnecting it. The main harness has a lever on the top that rotates towards the rear before it will release.
For the GPS antenna, I removed the top grill housing a speaker and HVAC vents. It is held in by a few clips. Lift the front slightly, then pry along the edges of the top surface, pull toward you. The antenna fits on top of the vent, right of center. Run the wire behind various support pieces to where the head unit goes. There is lots of wire, I stuffed it in beside the antenna. I removed the backing paper and stuck the antenna to the top of the vent structure so it wouldn't fall down inside somewhere.
For the USB-A outlets, I put them near the mesh in the passenger footwell and ran the wire through the side panel opening into the area where the head unit goes.
Connect the GPS antenna and USB cable to the head unit. Attach supplied antenna cable adapter to the car's connector and to the head unit, plugging the antenna male plug to the marked hole on the bottom corner of the head unit. (It doesn't look like a plug receptacle, but the plug fits in there. There is a label on the HU.)
Finally, connect the main wiring harness to the car's big harness, then to the HU.
BEFORE reassembling, test! Slip the HU back into the audio stack. Turn the car to ON or ACC position. The unit will boot up. (It's not quick, but there's a thrill when the first splash screen image shows.)
I played with the GPS to ensure it found my location, and scanned the radio frequencies. I then paired my iPhone. The unit's name is HLA and the pairing code is 0000.
Everything seemed to be working, so I put everything back together. I, too, dropped one screw, and one plastic cover plug failed to reappear, but it otherwise went back together easily. Remember to reconnect wires at each stage, especially the two harnesses that go to the shift boot assembly.
More images in my gallery:
Snags:
- Radio didn't work until I figured out where that male plug went
- Putting car into reverse triggered backup camera (there isn't one) warning until I found the setting to turn off the warning
First impressions:
- It looks fantastic. Good fit and finish. No more nearly-invisible blue text display! Bluetooth! Navigation!
- I'm glad I got CarPlay. The built-in Sygic nav seems to be horrible, gave me a wildly inefficient route and kept insisting on turns away from my destination to stay on that bad route. Reviews say it's a good system, but even CarNaviPlayer said it's bad and to use Google Maps.
- Boot time is slow (40 seconds). If you want to setup anything before driving, you'll want to allow for that after starting the car.
- There is much to learn. I think it will boot directly into CarPlay, I'd like to make that happen.

 )
)

