

Photobucket pics stink
see these you tube videos
Well my Service E was overdue since I reset the reminder at 26,000 miles. I have been
procrastinating to getting this done, i'm actually glad I didn't do it earlier since the Air
Filter was only about 20% dirty, could have gone another 10,000 miles easy.
edit JBanks15: added doc here also for R171/R172 Thanks Piet
DIY: Service E Cabin Air Filter Replacement
Nevertheless, I decided to do a write-up since there wasn't a good one yet...
Step1:
Tools Needed, Torx Screwdriver T-20.
Supplies: Mann Air Combination Filter (purchased from autowarehouseparts.com)
edit: Filter cost around $50, and free shipping
here's a link to the filter direct... its a genuine mb replacement part...
http://b.tinyurl.com/4k9zmf
don't worry about the pic they display on their site, they send you the correct one...
Step2:
The instructions supplied (pictures only) with the filter are pretty good, but the following
ones should help even more..
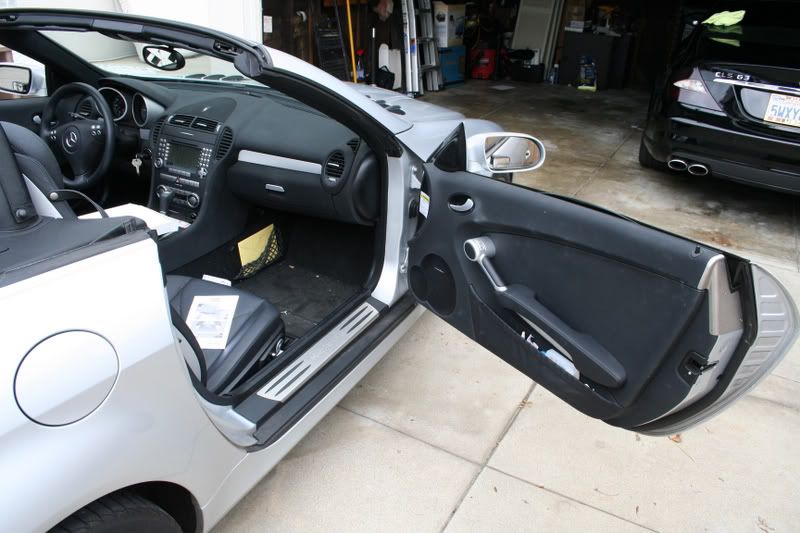
Step3:
Best way to have enough room to dive in there, is get the top down and open the passenger
door all the way.
![Image]()
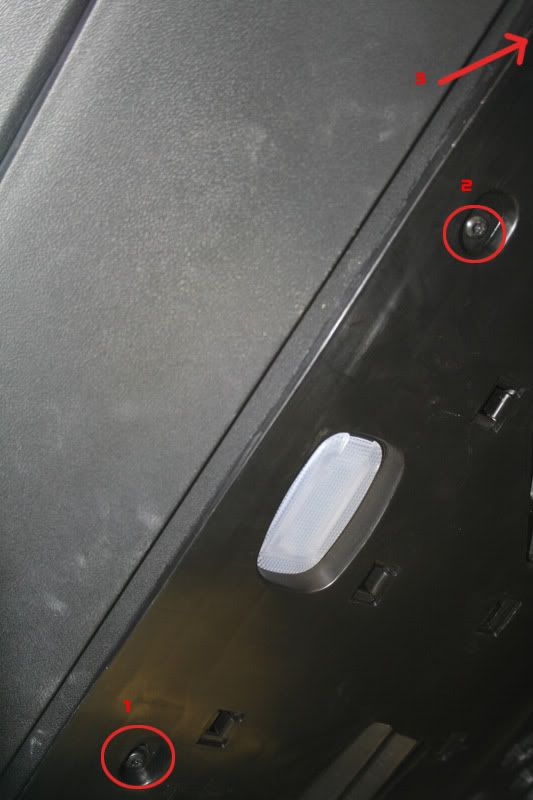
Step4:
Remove the three torx screws using your nifty torx-20 screwdriver.
![Image]()
Step5:
Pull back the padding in the footwell like in the picture below:
![Image]()
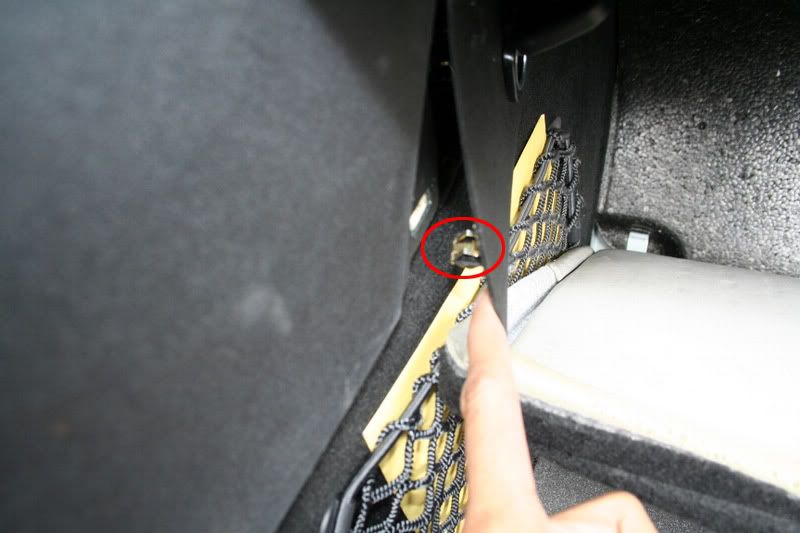
Step6:
There is tab holding the left part of the plastic piece, use a flat-head screwdriver to pop
it out.
![Image]()
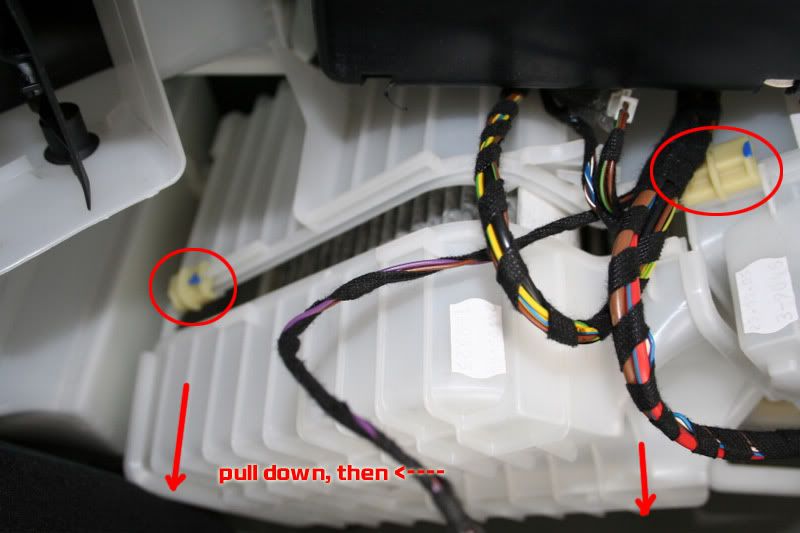
Step7:
Disconnect the light connector, and the cigarette lighter connection (this is a weird pull
down clip type plug, took some futzing to get it out)
The hardest part was figuring out how to remove the cigarette lighter cable, it looked like you needed to pull it sideways, when all the time, you just tug straight down
Step8:
Once the plastic piece is out, you will see a large white box, the filter is inside this
box. There are two yellow clips that need to be slided to the left/right. The box then pops
out from below and the folded-filter will fall right out.
![Image]()
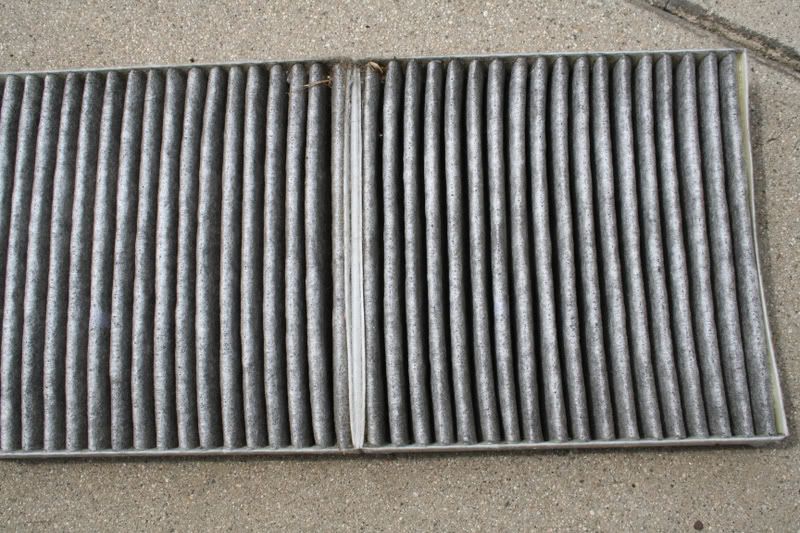
Pic of the old filter, as you can see its pretty clean after 30,000 miles:
![Image]()
Step9:
Make sure you remember the way the filter was (directionally).
![Image]()
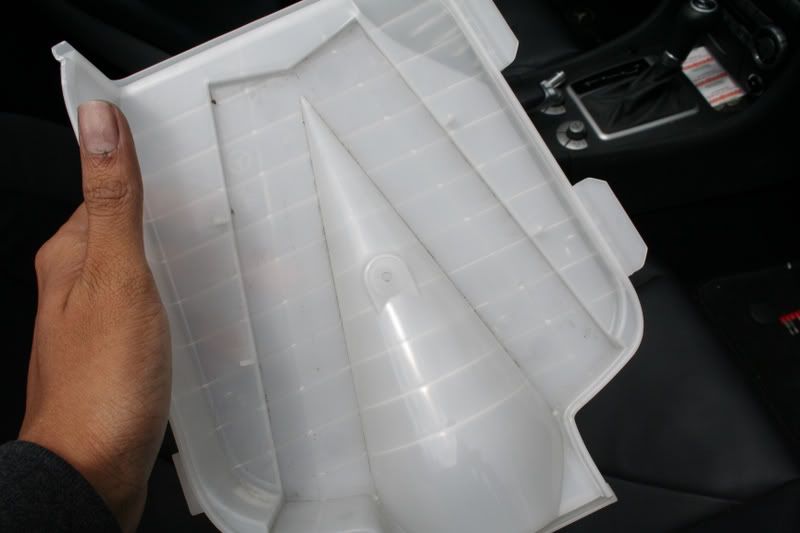
Step10:
That's the base of the filter box, take some time to clean it as well since you have access
it to it right now...
![Image]()
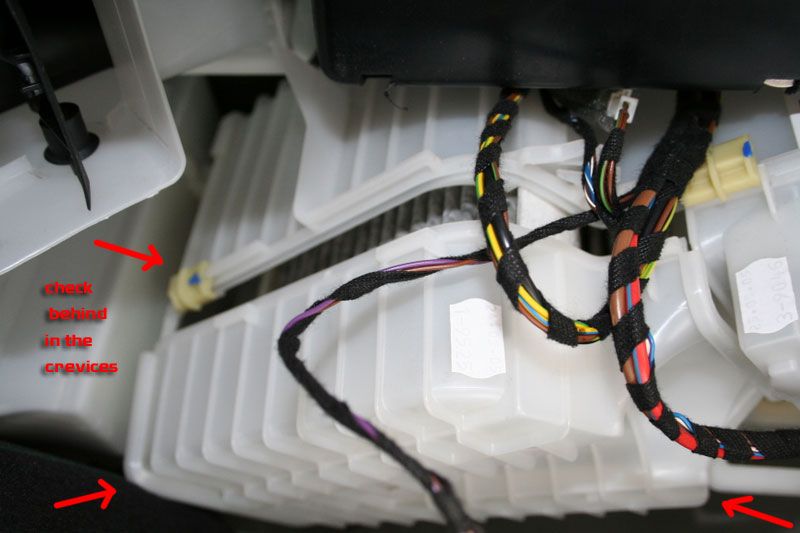
Step11:
Once you put the new filter in and put the under-part of the white box back on, you have to
be very careful to make sure it fits snugly. I read in other member's posts that they had to
remove and replace 2-3 times to ensure a snug fit with no air leaks. I had the exact same
thing happen to me!! You have to turn the A/C on, and then check for leaks with your hand
placed at several sides of the box.
Look at the diagram below to see the points to check.
![Image]()
Step12: Thats it, once you make sure the lower box is snugly fit, you're done!
Total Time : 1 hour , Supplies Cost: $50.00
see these you tube videos
Well my Service E was overdue since I reset the reminder at 26,000 miles. I have been
procrastinating to getting this done, i'm actually glad I didn't do it earlier since the Air
Filter was only about 20% dirty, could have gone another 10,000 miles easy.
edit JBanks15: added doc here also for R171/R172 Thanks Piet
DIY: Service E Cabin Air Filter Replacement
Nevertheless, I decided to do a write-up since there wasn't a good one yet...
Step1:
Tools Needed, Torx Screwdriver T-20.
Supplies: Mann Air Combination Filter (purchased from autowarehouseparts.com)
edit: Filter cost around $50, and free shipping
here's a link to the filter direct... its a genuine mb replacement part...
http://b.tinyurl.com/4k9zmf
don't worry about the pic they display on their site, they send you the correct one...
Step2:
The instructions supplied (pictures only) with the filter are pretty good, but the following
ones should help even more..
Step3:
Best way to have enough room to dive in there, is get the top down and open the passenger
door all the way.
Step4:
Remove the three torx screws using your nifty torx-20 screwdriver.
Step5:
Pull back the padding in the footwell like in the picture below:

Step6:
There is tab holding the left part of the plastic piece, use a flat-head screwdriver to pop
it out.
Step7:
Disconnect the light connector, and the cigarette lighter connection (this is a weird pull
down clip type plug, took some futzing to get it out)
The hardest part was figuring out how to remove the cigarette lighter cable, it looked like you needed to pull it sideways, when all the time, you just tug straight down
Step8:
Once the plastic piece is out, you will see a large white box, the filter is inside this
box. There are two yellow clips that need to be slided to the left/right. The box then pops
out from below and the folded-filter will fall right out.
Pic of the old filter, as you can see its pretty clean after 30,000 miles:
Step9:
Make sure you remember the way the filter was (directionally).

Step10:
That's the base of the filter box, take some time to clean it as well since you have access
it to it right now...
Step11:
Once you put the new filter in and put the under-part of the white box back on, you have to
be very careful to make sure it fits snugly. I read in other member's posts that they had to
remove and replace 2-3 times to ensure a snug fit with no air leaks. I had the exact same
thing happen to me!! You have to turn the A/C on, and then check for leaks with your hand
placed at several sides of the box.
Look at the diagram below to see the points to check.
Step12: Thats it, once you make sure the lower box is snugly fit, you're done!
Total Time : 1 hour , Supplies Cost: $50.00


") that cigarette lighter clip is a super-PITA!!!
that cigarette lighter clip is a super-PITA!!!

